
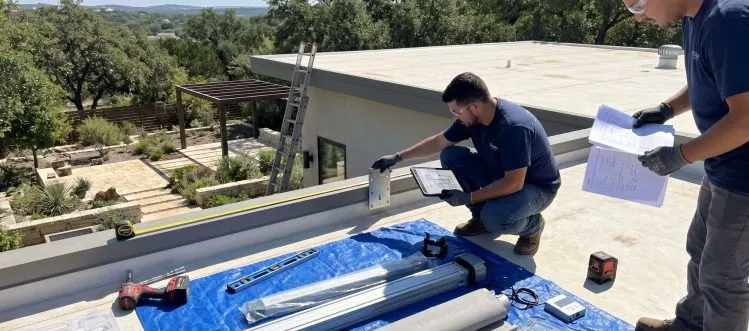
Most motorized roof shade failures happen during setup, not operation. Smart planning prevents expensive fixes later.
Installing a motorized roof shade system can transform your outdoor space, but poor planning turns this dream upgrade into a costly headache. Too many homeowners across Austin, West Lake Hills, and Lakeway rush into installation without understanding the critical setup decisions that determine whether their system works flawlessly for decades or requires constant repairs. The difference between a smooth installation and a problematic one often comes down to details that seem minor until they're causing major issues.
These seven tips address the most common setup mistakes that lead to motor failures, fabric damage, and structural problems down the road. Each tip tackles a specific aspect of the installation process, from initial site assessment through final testing, giving you the knowledge to work effectively with your installer and ensure your investment pays off. Whether you're planning a retractable fabric roof for your Bee Cave patio or a louvered system for your Horseshoe Bay deck, these insights will help you avoid the pitfalls that catch most first-time buyers off guard.
1. Conduct a Thorough Structural Assessment Before Any Installation Work
The biggest mistake homeowners make is assuming their existing structure can handle a motorized roof shade system without proper evaluation. Most patios and pergolas in Central Texas were built for static loads, not the dynamic forces created by motorized fabric systems or adjustable louvers during wind events. What looks sturdy enough for furniture and people might buckle under the lateral forces generated when 200 square feet of fabric catches a 30 mph gust, especially common during spring storms in the Austin area.
A proper structural assessment goes beyond visual inspection to include load calculations based on your specific system type and local wind conditions. USDA research on retractable structures shows that inadequate structural planning is the leading cause of system failures within the first two years. Professional installers use ASCE 7 wind load calculations to determine if your existing posts, beams, and foundations can handle the additional stress, or if reinforcement is needed before installation begins.
Assessment Priorities
- Foundation Inspection: Check existing footings for proper depth (typically 24-36 inches in Texas clay) and adequate concrete strength to resist uplift forces during high winds.
- Beam Capacity Analysis: Verify that existing beams can handle additional dead loads plus wind loads without deflection that could bind motorized components or stress fabric attachment points.
- Connection Point Evaluation: Examine all mounting locations for proper backing material, adequate fastener spacing, and appropriate hardware ratings for the expected loads.
- Electrical Infrastructure: Assess existing electrical capacity and routing options for motors, sensors, and control systems, ensuring compliance with NEC requirements for outdoor installations.
- Drainage Considerations: Evaluate how the new system will affect water flow patterns and ensure proper integration with existing gutters or drainage systems to prevent water damage.
The time and cost invested in a thorough structural assessment pays dividends by preventing expensive retrofits and ensuring your system operates reliably for years. Many installers in the Dripping Springs and Cedar Park areas have seen projects that required significant structural modifications after installation began, doubling the project cost and timeline. Getting this assessment right from the start keeps your project on budget and ensures your motorized roof shade system performs as designed, even during the intense summer storms that regularly sweep through Central Texas.
2. Choose the Right Motor Type and Placement for Your Specific Application
Motor selection and placement decisions made during setup determine whether your system operates quietly and reliably or becomes a source of constant frustration. Many homeowners don't realize that different motor types work better for different applications, and poor motor placement can create noise issues, maintenance headaches, and premature failure. The wrong motor choice is particularly problematic in residential settings where quiet operation matters, especially in neighborhoods like Steiner Ranch where homes are close together.
The key is matching motor torque, speed, and mounting requirements to your specific shade type and environmental conditions. Somfy motors offer different torque ratings from 10 Nm for small awnings to 120 Nm for large retractable systems, but higher torque doesn't always mean better performance. A 50 Nm motor running at 40% capacity will last longer and operate more quietly than a 30 Nm motor running at 90% capacity, even though both can handle the same fabric load.
Motor Considerations
- Torque Matching: Calculate actual fabric load including wind resistance and select a motor with 30-40% excess capacity to ensure smooth operation and extended lifespan under varying conditions.
- Noise Specifications: Choose motors rated below 45 dB at one meter for residential applications, particularly important for evening use and compliance with neighborhood noise ordinances.
- Environmental Protection: Ensure motors carry IP65 or higher ratings for outdoor exposure, with sealed bearings and corrosion-resistant housings designed for Texas humidity and temperature extremes.
Proper motor selection and placement create the foundation for years of trouble-free operation while poor choices lead to costly replacements and ongoing maintenance issues. The difference between a motor that lasts 15 years and one that fails after 5 often comes down to these initial setup decisions, making it worth investing time to get them right from the start.
3. Plan Your Control System Integration from Day One
Control system planning often gets treated as an afterthought, but the decisions you make during initial setup determine how well your motorized roof shade system integrates with your lifestyle and home automation. Most homeowners underestimate the importance of sensor placement, wireless signal strength, and smart home compatibility until they're dealing with systems that don't respond reliably or can't connect to their existing automation platform. What works perfectly during a demonstration might fail when installed in your specific environment with its unique interference patterns and coverage challenges.
The key is designing your control system around how you actually use your outdoor space, not just basic open and close functions. Energy-efficient shading strategies work best when automated based on sun position, temperature, and weather conditions, but this requires thoughtful sensor placement and programming during initial setup. Smart integration with platforms like Control4, Lutron, or even basic voice control through Alexa requires specific hardware choices and network planning that must happen before installation, not as an expensive retrofit later.
Here's a comparison of common control system options and their integration capabilities:
| Control Type | Smart Home Integration | Automation Features | Installation Complexity |
|---|---|---|---|
| RF Remote Only | None | Basic open/close | Simple |
| Wireless Wall Switch | Limited | Preset positions | Moderate |
| Smart Hub System | Full integration | Weather automation, scheduling | Complex |
| Hardwired Controls | Platform dependent | Advanced scenes, sensors | Most complex |
4. Account for Seasonal Weather Patterns in Your Setup Configuration
Central Texas weather patterns create unique challenges for motorized roof shade systems that many installers from other regions don't fully understand. The combination of intense UV exposure, sudden temperature swings, and severe thunderstorms requires specific setup considerations that prevent weather-related damage and ensure reliable operation year-round. Many systems installed without proper weather planning fail during their first major storm or suffer premature fabric degradation from UV exposure that could have been prevented with better initial configuration.
The solution involves programming your system's sensors and limits based on local weather data, not generic factory settings. Wind sensors should trigger retraction at 25-30 mph in the Austin area, where storms can intensify quickly and gusts often exceed sustained wind speeds by 20-30 mph. Research on roof shading performance shows that systems configured for local conditions last 40% longer than those using standard settings, making this setup step crucial for protecting your investment.
5. Establish Proper Fabric Tensioning and Attachment Methods
Fabric tensioning mistakes during setup create most of the long-term problems that plague motorized roof shade systems. Too little tension allows fabric to flap and stretch during wind events, leading to premature wear and potential tearing, while excessive tension stresses seams and attachment points, causing failures that often aren't covered under warranty. The challenge is achieving consistent tension across the entire fabric surface while accounting for thermal expansion and contraction that occurs throughout the day as temperatures fluctuate.
Proper tensioning requires understanding how different fabric types behave under stress and environmental conditions. Solution-dyed acrylic fabrics like Sunbrella need different tensioning approaches than PVC-coated polyester membranes, and the attachment method must match both the fabric type and the expected load conditions. Many installations in the Lake Travis area have failed because installers used residential awning techniques for larger architectural shade systems that require different tensioning specifications.
Tensioning Essentials
- Initial Tension Setting: Apply manufacturer-specified tension levels using calibrated tools, typically 50-100 pounds of force per linear foot depending on fabric type and system design.
- Thermal Compensation: Account for fabric expansion and contraction by setting tension during moderate temperatures (70-80°F) rather than during extreme heat or cold.
- Attachment Hardware: Use appropriate keder rail systems, spring-loaded tensioners, or belt-driven mechanisms designed for your specific fabric weight and wind load requirements.
- Edge Reinforcement: Ensure proper hem construction and edge finishing to prevent stress concentration at attachment points, particularly critical for large spans common in Texas installations.
Getting fabric tensioning right during initial setup prevents most of the maintenance issues and premature failures that frustrate homeowners later. The investment in proper tensioning tools and techniques during installation pays for itself many times over by extending fabric life and maintaining the clean, taut appearance that makes these systems so attractive.
6. Install Comprehensive Safety and Monitoring Systems
Safety systems often get skipped or simplified during installation to save costs, but this creates liability issues and almost always leads to expensive damage when weather conditions exceed the system's safe operating limits. Motorized roof shade systems generate significant forces during operation and can become dangerous projectiles if they fail during high winds, making proper safety systems essential rather than optional. Insurance claims related to shade system failures often get denied when proper safety equipment wasn't installed according to manufacturer specifications.
Effective safety systems work automatically to protect both the equipment and people around it, but they must be properly calibrated for local conditions during initial setup. Professional shading design principles emphasize that safety systems should activate before damage occurs, not just prevent catastrophic failure. This requires understanding the specific wind patterns and storm characteristics common to Central Texas and programming your sensors accordingly.
Safety Components
- Wind Sensors: Install anemometers calibrated to retract the system at 25-30 mph sustained winds, with backup manual override capabilities for emergency situations.
- Obstruction Detection: Implement motor current sensing or torque limiting to stop operation when unexpected resistance is encountered, preventing damage to both the system and obstacles.
- Emergency Stop Controls: Position easily accessible manual stops at multiple locations, particularly important for large systems that might need immediate shutdown during emergencies.
Comprehensive safety systems provide peace of mind and protect your investment, but they only work when properly installed and calibrated during initial setup. The relatively small additional cost of complete safety equipment prevents the much larger costs associated with storm damage, injury liability, and insurance claims that often result from inadequate safety planning.
7. Perform Thorough Testing and Calibration Before Final Handoff
The testing and calibration phase determines whether your motorized roof shade system works reliably from day one or requires constant adjustments and service calls. Many installers rush through this critical step, leaving homeowners with systems that work inconsistently or fail to respond properly to environmental conditions. Proper testing involves more than just verifying that the motor runs and the fabric moves, it requires confirming that all sensors, limits, and safety systems work correctly under various conditions.
Comprehensive testing should simulate the actual conditions your system will face, including different weather scenarios, load conditions, and operating sequences. This is particularly important in the Texas climate where systems might operate multiple times per day during summer months and face sudden weather changes that test every aspect of the installation. A system that passes basic functionality tests but fails during its first thunderstorm clearly wasn't tested thoroughly enough during setup.
Here's a testing checklist to ensure complete system verification:
| Test Category | Specific Tests | Pass Criteria | Documentation Required |
|---|---|---|---|
| Mechanical Operation | 10 full cycles, load testing | Smooth operation, no binding | Cycle count, load readings |
| Sensor Functions | Wind, rain, sun sensor activation | Proper threshold response | Sensor settings, response times |
| Safety Systems | Emergency stops, obstruction detection | Immediate system shutdown | Safety test results |
| Control Integration | All remotes, switches, smart home | Reliable response | Control system settings |
| Weather Simulation | Simulated storm conditions | Automatic protection activation | Weather response log |
Testing Protocol
- Full Cycle Testing: Run complete extension and retraction cycles at least 10 times to identify any binding, irregular movement, or noise issues before considering the installation complete.
- Sensor Calibration: Test all wind, rain, and sun sensors under actual conditions, adjusting sensitivity settings based on site-specific environmental factors and homeowner preferences.
- Load Testing: Verify system performance under simulated wind loads using controlled methods to ensure motors, fabric, and structure can handle expected conditions safely.
- Control System Verification: Test all remote controls, wall switches, and smart home integrations to confirm reliable communication and proper response to all programmed commands and scenarios.
- Safety System Validation: Trigger all safety systems including emergency stops, obstruction detection, and automatic weather protection to ensure they activate correctly and completely.
Thorough testing and calibration during setup prevents most of the service calls and adjustments that plague poorly commissioned systems. The time invested in comprehensive testing pays dividends in reliable operation and customer satisfaction, ensuring your motorized roof shade system performs exactly as expected from the first day of operation through years of dependable service.
Your Setup Success Strategy
These seven tips address the most critical aspects of motorized roof shade setup that separate successful installations from problematic ones. The key insight is that most issues stem from rushed or incomplete setup processes rather than equipment failures, making careful attention to these details your best insurance against future problems. When you invest time in proper structural assessment, motor selection, control integration, weather planning, fabric tensioning, safety systems, and thorough testing, you create the foundation for years of reliable operation and enjoyment.
The difference between a smooth setup and a troubled one often comes down to working with installers who understand these critical factors and take the time to implement them correctly. Your motorized roof shade system represents a significant investment in your outdoor living space, and following these setup guidelines ensures that investment pays dividends in comfort, convenience, and long-term reliability. Take the time to get these details right during installation, and you'll enjoy seamless operation for decades to come.
Author
Lane Frazier is an experienced motorized shade specialist who has guided hundreds of homeowners through successful installations across the Austin area over the past two decades. His hands-on approach to system setup and calibration has prevented countless post-installation issues and helped establish best practices for motorized roof shade systems in Central Texas. Lane's expertise comes from working with every major shade system manufacturer and seeing firsthand what separates reliable installations from problematic ones.
Ready For a Quote?
Get your custom shade quote Today.
Free, no-pressure consultation. We measure, photograph, and send a written line-item proposal within a week. Most installs ship in 3–5 weeks.
Call the workshop
(512) 939-3446
Mon–Fri · 8a–5p CT · Austin, TX
Prefer to talk it through? Calls are answered by the same team that builds your quote — no call centers, no gatekeepers.
Custom exterior shades, motorized patio screens, awnings, and interior window treatments for Austin and Central Texas.
How To Contact Us
Austin, TX 78734
Monday - Friday 8 AM - 5 PM
navigate
Copyright © 2026 | Treaty Oak Shade Co. All Rights Reserved. | Privacy Policy